Adding message text to your store's chat widget helps set expectations for your visitors and can guide them through their shopping journey. Here’s how to configure it effectively.
Step 1: Access the bitChat Chat Widget Dashboard
- Go to the bitChat Chat widget dashboard and enable toggle “Power message”
![](https://cdn.prod.website-files.com/659655f5b20d395a5c69efcf/66ff507e251100da1fe374b7_AD_4nXfVu0ExYlSBQUDXWEWjH7oDyxs3HdsY7uTcdU-nsTg8_q1J-Oi0Y5c9rNJRM9Lw3KkWSRgTzXyF7ZGT8-wmGEHrhCmwkF5k5xfSdOLaqdPWs2ssVApGIOUurIufekoKoBqGIuVIO7lQGhfdI726v1TYrUQ.png)
Step 2: Customize the Message
- Fill in the header and description.
![](https://cdn.prod.website-files.com/659655f5b20d395a5c69efcf/66ff507ee0dc8df068425c48_AD_4nXd5LoXEH2YZh7D77FhKVmcc5T8frsj90UIII43FFzZ9XM_4Rwl-dHJm8dHNo5g4hqj5N_Us30uwSYwUIXslEVO7LwhmwFacq8leKLb2SCZz__3GT6QdRbOErM4TM3NtS5fSsSIxN5H9zg_JqcJnUiwmUvCm.png)
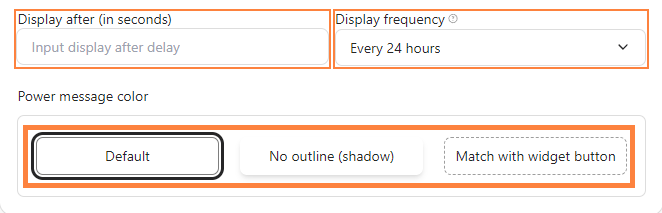
Step 3: Set Timing & Message Color
- Set the timing and pick the message color.
![](https://cdn.prod.website-files.com/659655f5b20d395a5c69efcf/66ff507ebab68713a4fb5964_AD_4nXexTuNq9cjD7kiPq6vVUbJd45qPvOBGMYNJEL1eVamLCrS10WHkXjWVAAJUsY7_5_DqKIPAuNMEAIF24gUL2CShMgtHKnacI0XR2A0k3c4yLQY1cwrftb5dHk06L3aN5dovaemCOzX5iSJlLq88l0fJhQk.png)
Step 4: Save
- Click “Save Changes”.
![](https://cdn.prod.website-files.com/659655f5b20d395a5c69efcf/66ff4e96dd07492f0ca27318_66fe685d5d78b249df1e1da0_AD_4nXfMEwmXptvBBdLzfO3EOuB2nz-Jx9Z2kxQrFCB-ra5eKGv4mcrmBYlkXxIUEfNxIcFo514grcgpErcE6zCgQxvY5ld1RUDFcgMDPc_4q3Yr8PqwnTVec3-hIrTFq5FGJc4lfzn1bj3JlWeJHPfneFldX-pb.png)
For further assistance, reach out to us at help@bitbybit.studio